10 tips and tricks for camping tents
Table of Contents
Choose the right size: When selecting a camping tent, make sure to consider the size of your camping group and the amount of gear you will be bringing. It is better to have a tent that is a little larger than you need, rather than one that is too small.

Practice setting up: Before your camping trip, practice setting up your tent at home to ensure you know how to do it quickly and efficiently.

Select a suitable location: Choose a flat and dry area for setting up your tent. Avoid areas with potential hazards, such as dead trees or loose rocks.

Keep the interior organized: Use storage solutions to keep your camping gear organized and easily accessible inside the tent.

Keep the tent clean: Regularly clean your tent to prevent dirt, debris, and moisture from accumulating, which can damage the fabric and shorten the lifespan of your tent.

Use a groundsheet: A groundsheet can help protect the bottom of your tent from rough or damp surfaces and prolong its lifespan.

Ventilate properly: Proper ventilation is crucial to prevent condensation from building up inside the tent, which can cause dampness and mold.

Use guy lines: Guy lines help stabilize your tent in windy conditions and prevent it from collapsing or tipping over.

Secure the rainfly: Make sure the rainfly is properly secured to prevent rainwater from leaking into the tent.

Inspect your tent regularly: Regularly inspect your tent for damage or wear and tear, and make repairs as needed to ensure its longevity and safety.
Choose the right tent size
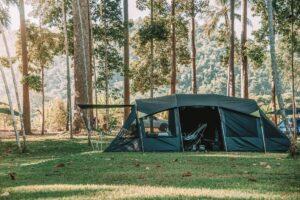
When it comes to camping, choosing the right size of tent is crucial for a comfortable and enjoyable experience. A tent that is too small can be cramped and uncomfortable, while a tent that is too large can be heavy, difficult to set up, and not practical for the number of people camping. In this article, we will discuss how to choose the right size of camping tent for your needs.
Group Size: The first factor to consider when choosing a camping tent is the size of your group. For a single person, a one-person tent is sufficient, but for a family or group of friends, a larger tent is required. As a general rule of thumb, you should add two people to the capacity of the tent to ensure that everyone has enough space to sleep comfortably. For example, a four-person tent is suitable for two adults and two children.
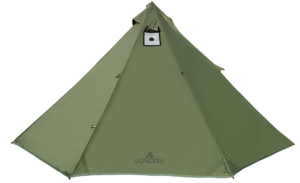
Height: The height of a tent is also an essential factor to consider when choosing the right size. A tent with a higher peak height allows campers to stand up comfortably and move around freely. Tents with lower peak heights are usually smaller and more compact, and are ideal for backpacking or camping in areas with limited space.
Length and Width: The length and width of a tent are also crucial factors to consider when choosing the right size. You should ensure that the tent is long enough to accommodate the tallest member of your group, and wide enough to provide enough space for everyone to sleep comfortably.
Storage Space: In addition to sleeping space, it is also important to consider the storage space required for your camping gear. A tent that is too small may not have enough space to store your gear, while a tent that is too large can be cumbersome and difficult to set up.
Intended Use: Finally, it is essential to consider the intended use of the tent. If you plan to use the tent for backpacking or hiking, a smaller and more lightweight tent is more suitable. If you plan to use the tent for car camping, a larger tent with more space and comfort features is more practical.In conclusion, choosing the right size of camping tent is crucial for a comfortable and enjoyable camping experience. By considering factors such as group size, height, length and width, storage space, and intended use, you can select a tent that is the right size for your needs. Remember to read product descriptions and reviews carefully and choose a tent that suits your budget, preferences, and camping style.
Practice setting up
Setting up a camping tent can be a daunting task, especially if you have never done it before. However, with a little practice and patience, you can become an expert at setting up your tent quickly and efficiently. In this article, we will discuss how to practice setting up a camping tent.
Read the Instructions: Before setting up your tent, make sure to read the instructions carefully. This will ensure that you have all the necessary parts and that you know how to set up the tent properly.

Gather Your Supplies: Before you start setting up your tent, gather all the necessary supplies, including the tent, poles, stakes, and guylines. Lay them out in an organized manner, so that you can easily find everything you need.

Choose a Suitable Location: Choose a flat and dry location for setting up your tent. Avoid areas with potential hazards, such as dead trees or loose rocks.

Lay out the Tent: Lay out the tent flat on the ground, making sure that all the corners are straight and the doors are facing the right direction.

Assemble the Poles: Assemble the poles according to the instructions, and slide them through the corresponding sleeves or clips on the tent. Ensure that they are inserted correctly and securely.

Raise the Tent: Once the poles are assembled and inserted, it's time to raise the tent. Grab the center of the tent and lift it, so that it stands upright. Make sure that the poles are standing straight and that the tent is taut.

Secure the Tent: Use stakes and guylines to secure the tent to the ground. Stakes should be inserted at a 45-degree angle, away from the tent, and should be hammered in all the way to the ground. Guylines should be attached to the loops or rings on the tent and anchored to the ground with stakes.

Practice, Practice, Practice: The more you practice setting up your tent, the more efficient you will become. Try setting up your tent at home, in your backyard or in a local park, and time yourself to see how quickly you can do it.

Take Down Your Tent: Practice taking down your tent too. This will help you understand the process and ensure that you don't forget anything or leave anything behind.

Seek Help: Don't be afraid to seek help from a friend or family member if you're struggling with setting up your tent. Having someone to assist you can make the process much easier and more enjoyable.
In conclusion, practicing setting up a camping tent is crucial to ensure that you can do it quickly and efficiently on your camping trip. By following these tips and practicing regularly, you can become an expert at setting up your tent and enjoy a stress-free camping experience.
Select a suitable location for tent setup
Camping is a great way to connect with nature and enjoy the great outdoors. One of the most important aspects of a successful camping trip is selecting a suitable location for your camping tent setup. In this article, we will discuss how to select a suitable location for your camping tent.
Check the Ground: The first thing to consider when selecting a location for your camping tent setup is the ground. Make sure the ground is flat, dry, and free of rocks and other debris. Avoid areas with steep inclines, as this can lead to uncomfortable sleeping conditions.

Look for Natural Protection: Look for natural protection from the elements such as trees or shrubs. This will provide some shade during the day and shelter from the wind at night.

Check for Hazards: Avoid areas with potential hazards such as dead trees, loose rocks, or other obstacles that could pose a safety risk.

Consider Water Access: Consider the proximity to water sources such as lakes, rivers, and streams. While it's important to be close to water, make sure to set up your tent at a safe distance to avoid any potential hazards such as flooding.

Keep Wildlife in Mind: Keep wildlife in mind when selecting a location for your camping tent setup. Look for signs of animal activity, such as tracks or droppings, and avoid areas that may attract bears or other potentially dangerous animals.

Choose a Suitable Distance from Other Campers: Choose a suitable distance from other campers to ensure privacy and minimize noise disruptions.

Follow Park Regulations: If you're camping in a national or state park, make sure to follow the park regulations regarding camping locations. Some parks have designated camping areas or restrictions on where you can set up your tent.

Avoid High Traffic Areas: Avoid high traffic areas such as trails or popular attractions. These areas can be noisy and disruptive, and may also pose a safety risk.

Take the Weather into Consideration: Take the weather into consideration when selecting a location for your camping tent setup. Look for areas that offer natural shelter from wind and rain, and avoid low-lying areas that may be prone to flooding.

Plan Ahead: Plan ahead when selecting a location for your camping tent setup. Research the area ahead of time, and scout potential locations before arriving at the campsite.
In conclusion, selecting a suitable location for your camping tent setup is crucial to ensure a safe, comfortable, and enjoyable camping experience. By considering factors such as ground conditions, natural protection, hazards, wildlife, and park regulations, you can choose a location that will meet your needs and provide a great camping experience.
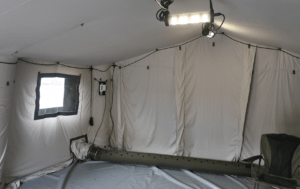
Keeping the interior of camping tent organized
Keeping the interior of your camping tent organized can make your outdoor adventure much more enjoyable. A well-organized tent can make it easier to find your gear, create a comfortable living space, and reduce the chance of tripping over items in the middle of the night. In this article, we’ll discuss some tips on how to keep the interior of your camping tent organized.
Plan Ahead: Before you head out on your camping trip, create a checklist of everything you'll need to bring with you. This can include items such as bedding, cooking supplies, clothes, and personal items. Make sure to pack items in separate bags or containers to help keep them organized.

Use Storage Solutions: Many camping tents come with pockets or gear lofts that can be used to store smaller items such as flashlights, phones, and other personal items. You can also use hanging organizers or storage cubes to keep larger items organized.

Create a Sleeping Area: Set up your sleeping area in one section of the tent, and use a sleeping pad and sleeping bag to create a comfortable sleeping space. Keep your sleeping bag and pad organized by rolling them up and storing them in a compression sack or stuff sack.

Designate a Cooking Area: Create a designated cooking area by setting up a camping stove or grill and storing cooking supplies in a separate bag or container. Use a table or cooking stand to keep your cooking area organized and clean.

Keep Shoes Outside: To prevent dirt and debris from getting inside your tent, leave your shoes outside or store them in a designated shoe bag or container.

Create a Clothesline: Create a clothesline by hanging a rope between two trees or using a clothesline kit. This can be used to hang wet clothes or towels, and will help keep your tent interior clean and organized.

Keep Trash Under Control: Use a trash bag or container to collect any trash or food waste. Make sure to dispose of trash properly by using a campsite trash can or designated waste disposal area.

Keep Your Gear Organized: Use a gear bag or container to store larger items such as camping chairs, sleeping cots, or tents. Keep items organized and easy to find by labeling them with tags or markers.

Use Velcro or Zip Ties: Use velcro or zip ties to secure loose items such as cords or clotheslines. This will help prevent items from getting tangled or creating a safety hazard.

Clean Up Regularly: Take a few minutes each day to tidy up your tent interior. This will help maintain a clean and organized living space throughout your camping trip.
In conclusion, keeping the interior of your camping tent organized can make your outdoor adventure more enjoyable and comfortable. By using storage solutions, designating specific areas for sleeping and cooking, creating a clothesline, and cleaning up regularly, you can create a well-organized living space that will make your camping trip a success.
Keep the tent clean
Camping is a fun way to explore the great outdoors and create lasting memories with family and friends. However, keeping your camping tent clean is important to ensure a comfortable and hygienic living space. In this article, we’ll discuss some tips on how to keep your camping tent clean.
Choose the Right Campsite: Choose a campsite that is free of debris and standing water. This will help prevent dirt and moisture from getting inside your tent and reduce the chances of mold or mildew growth.

Use a Ground Cloth: Use a ground cloth or tarp underneath your tent to protect the bottom from dirt and moisture. This will also make it easier to clean the tent interior.

Shake Out Dirt and Debris: Before packing up your tent, shake out any dirt or debris that has accumulated inside. This will help prevent dirt from getting into your gear during transport.

Sweep and Vacuum: Use a broom or vacuum to clean the tent floor and walls. This will help remove any dust or dirt that may have accumulated during your camping trip.

Wipe Down Surfaces: Use a damp cloth or baby wipes to wipe down surfaces such as the tent walls, windows, and zippers. This will help remove any dirt or grime and keep the tent looking clean.

Air Out the Tent: After cleaning the tent, open the doors and windows to allow fresh air to circulate. This will help prevent moisture from accumulating and reduce the chances of mold or mildew growth.

Store the Tent Properly: Store the tent in a cool, dry place to prevent mold or mildew growth. Make sure to fold the tent neatly and store it in a bag or container to keep it clean and protected.

Avoid Eating and Drinking Inside: Eating and drinking inside the tent can lead to spills and stains. Instead, use a designated area outside the tent for meals and snacks.

Keep Shoes Outside: To prevent dirt and debris from getting inside the tent, leave your shoes outside or store them in a designated shoe bag or container.

Clean Up Regularly: Take a few minutes each day to tidy up your tent interior. This will help maintain a clean and organized living space throughout your camping trip.
In conclusion, keeping your camping tent clean is essential to ensuring a comfortable and hygienic living space during your outdoor adventure. By choosing the right campsite, using a ground cloth, sweeping and vacuuming, wiping down surfaces, airing out the tent, storing the tent properly, avoiding eating and drinking inside, keeping shoes outside, and cleaning up regularly, you can keep your camping tent clean and well-maintained for many adventures to come.
How to use a groundsheet
If you’re a seasoned camper or backpacker, you already know the importance of having a good quality groundsheet for your tent. Not only does it provide an extra layer of insulation and protection from moisture, but it also helps to extend the life of your tent by preventing wear and tear on the bottom. In this article, we’ll discuss how to use a groundsheet properly.
Choose the Right Size: Make sure you choose a groundsheet that fits your tent’s dimensions. It should be slightly smaller than the tent’s floor to prevent rain from pooling between the tent and the groundsheet. If the groundsheet is too large, it can cause moisture to get trapped and create a damp environment.

Clear the Area: Before laying down your groundsheet, clear the area of any sharp objects, rocks, or debris that could puncture or damage the material.

Lay it Out: Once the area is cleared, lay the groundsheet flat on the ground where you plan to set up your tent. Make sure it’s smooth and free of wrinkles.

Secure the Corners: Use tent stakes or rocks to secure the corners of the groundsheet to the ground. This will prevent it from shifting or blowing away in the wind.

Set Up Your Tent: Once the groundsheet is secured, set up your tent on top of it. Make sure the tent’s footprint is aligned with the groundsheet to ensure maximum protection from moisture.

Tuck in Excess Material: If your groundsheet is larger than your tent, tuck any excess material under the tent. This will prevent rain from pooling on the groundsheet and creating a damp environment.

Pack It Up: When it’s time to pack up camp, remove the tent and fold the groundsheet neatly. Be sure to shake out any dirt or debris that may have accumulated on the groundsheet. Store it in a dry, cool place until your next camping trip.
Using a groundsheet is an important part of tent camping. It not only protects your tent from moisture and wear and tear, but it also provides an extra layer of insulation for added comfort. By choosing the right size, clearing the area, securing the corners, setting up your tent, tucking in excess material, and packing it up properly, you can ensure that your groundsheet will last for many camping trips to come.
Ventilate a tent properly
Ventilating a tent properly is essential to ensure that you have a comfortable and safe camping experience. Without proper ventilation, the inside of a tent can become stuffy, damp, and even dangerous due to the buildup of carbon monoxide from cooking stoves and heaters. In this article, we’ll discuss how to ventilate a tent properly.
Choose a Good Location: When selecting a location for your tent, look for a spot that is open and allows air to flow freely. Avoid setting up your tent in a low-lying area or where there is little to no wind.

Open the Windows: Most tents come with windows that can be opened to allow fresh air to circulate. Open them up and secure them with the attached straps or zippers.

Use a Mesh Tent: If you’re camping in a hot and humid environment, consider using a mesh tent that allows air to flow freely. These tents have larger mesh panels that provide better ventilation.

Use a Rainfly Sparingly: While it’s important to use a rainfly to keep your tent dry during rain or snow, it can also restrict air flow. Only use the rainfly when necessary, and remove it during hot and humid weather.

Keep the Door Open: Keeping the door of your tent open during the day can help to improve air circulation. This will also prevent carbon monoxide from building up if you’re using a stove or heater inside your tent.

Create a Cross Breeze: If there is little to no wind, you can create a cross breeze by using two windows or doors on opposite sides of the tent. This will allow fresh air to flow through the tent.

Use a Fan: If you’re camping with a power source, consider using a fan to improve air circulation inside the tent. This will help to keep the air fresh and cool.
Properly ventilating your tent is crucial to ensure a comfortable and safe camping experience. By selecting a good location, opening the windows, using a mesh tent, using a rainfly sparingly, keeping the door open, creating a cross breeze, and using a fan, you can ensure that the air inside your tent stays fresh and healthy. Always prioritize ventilation when camping, even if it means sacrificing a little bit of privacy or warmth.
How to use guy lines
When setting up a tent, it’s important to use guy lines to ensure that your tent remains stable and secure. Guy lines are cords that are attached to the tent and secured to the ground to prevent the tent from being blown away by wind or gusts. In this article, we’ll discuss how to use guy lines for your tent.
Locate the Guy Line Attachment Points: Most tents come with pre-attached guy line attachment points. These attachment points are usually located on the rainfly or tent body.

Set Up the Tent: Before setting up the guy lines, make sure that your tent is properly set up and all the poles are secured.

Determine the Length of the Guy Lines: Guy lines should be long enough to provide adequate tension, but not so long that they become a tripping hazard. A good rule of thumb is to make them about twice the length of the tent.

Tie the Guy Lines: Tie one end of the guy line to the attachment point on the tent and the other end to a stake or other secure anchor point on the ground. If the ground is too hard, you may need to use a rock or other heavy object to anchor the guy line.

Tighten the Guy Lines: Once the guy line is tied to the tent and the anchor point, tighten the line to provide adequate tension. Make sure the guy line is taut but not so tight that it pulls the tent out of shape.

Repeat for All Guy Lines: Repeat this process for all the guy lines on the tent. Most tents will have at least four guy lines, but larger tents may require more.

Adjust as Needed: If the wind picks up or if your tent begins to sag, adjust the tension on the guy lines to ensure that the tent remains stable.
Properly using guy lines is essential to ensure that your tent remains stable and secure during windy or gusty conditions. By locating the attachment points, tying the guy lines, tightening them, and adjusting as needed, you can ensure that your tent remains stable and safe. Be sure to practice setting up your tent and using guy lines before your camping trip to ensure that you’re prepared for any conditions you may encounter.
How to secure the rainfly
A rainfly is an essential component of most camping tents, as it helps to keep the tent dry in wet weather. But to keep the rainfly from flapping in the wind and to prevent it from being damaged, it’s important to secure it properly. In this article, we’ll discuss how to secure the rainfly for your tent.
Locate the Rainfly Attachment Points: Most tents have attachment points on the tent body or on the tent poles where the rainfly can be attached.

Set Up the Tent: Before attaching the rainfly, make sure that your tent is properly set up and all the poles are secured.

Attach the Rainfly: Once the tent is set up, attach the rainfly to the attachment points on the tent. Start by attaching the rainfly to the corners of the tent and then work your way around the perimeter.

Tighten the Rainfly: Once the rainfly is attached to the tent, tighten it to remove any slack. This will prevent the rainfly from flapping in the wind and keep it from being damaged.

Stake Down the Rainfly: Once the rainfly is attached and tightened, stake it down to keep it in place. Use the included stakes to secure the rainfly to the ground.

Adjust as Needed: If the wind picks up or if the rainfly begins to sag, adjust the tension to ensure that it remains stable.
Properly securing the rainfly is essential to keep your tent dry and in good condition. By locating the attachment points, attaching the rainfly, tightening it, staking it down, and adjusting as needed, you can ensure that your rainfly remains secure and stable. Be sure to practice setting up your tent and securing the rainfly before your camping trip to ensure that you’re prepared for any weather conditions you may encounter.
Tent inspecting
Regular tent inspection is important to ensure that your tent is in good condition and can keep you safe and dry during your camping trips. In this article, we’ll discuss the steps you should take to regularly inspect your tent.
Set Up Your Tent: The first step in inspecting your tent is to set it up. Make sure to set it up in a well-lit area and on a flat surface.

Inspect the Tent Body: Check the tent body for any holes, tears, or punctures. If you find any, repair them as soon as possible to prevent further damage.

Check the Seams: Look at the seams of the tent body and rainfly for any signs of wear or damage. Seam tape can wear out over time, so make sure to repair any damaged seams to prevent leaks.

Check the Zippers: Inspect the zippers on the tent body and rainfly. Make sure they move smoothly and that there are no missing or broken teeth.

Inspect the Poles: Check the tent poles for any signs of wear or damage. Make sure that they are all present and that the pole segments are connected securely.

Check the Guy Lines: Inspect the guy lines and adjust them if necessary. Make sure that they are taut and that the tensioners are working properly.

Check the Stakes: Look at the tent stakes for any signs of wear or damage. Replace any bent or broken stakes to ensure that your tent is securely anchored.

Inspect the Rainfly: Check the rainfly for any holes or tears. Make sure that it is securely attached to the tent body and that it provides adequate coverage.

Check the Storage Bag: Finally, inspect the tent storage bag for any signs of wear or damage. Make sure that it is clean and that the zippers and straps are working properly.
By following these steps and regularly inspecting your tent, you can catch any damage or wear before it becomes a bigger problem. This will help to keep your tent in good condition and ensure that it will keep you safe and dry on your camping trips. Always make sure to repair any damage or replace any worn components as soon as possible to prevent further damage and ensure the longevity of your tent.